Slalom: Setting up your cone lines
Setting up a new slalom spot to the official norms requires precision and method. The OLS team gives you advice to set up your classic slalom area...
Par alfathor

Method
To trace a slalom area, you should know the basic rules of the discipline. The set up will be different if you do speed slalom, classic or battle. If you don’t know the number of cones needed and their spacings, check out our article: Slalom Skating for Dummies.
Let’s pick up the example of the classic slalom area:

To set up the ara, you’ll need:
• 3 sharpies of different colors
• An inelastic cord of 20 m
• 2 ballasts
• 1 measuring tape
• 20 cones of one color
• 20 cones of another color
• 14 cones of a third color
• 1 wrapping support for the cord
• 1 piece of chalk
Step 1: Mark the cord with the different spacings
 The first step consists in marking the cord with the different spacings (use a different color for each spacing)
- Choose a sharpie color for each spacing, for example red for the 120 cm, blue for the 80 cm and yellow for the 50 cm.
- Uncoil the measuring tape on a table up to 120 cm, the maximum spacing between two cones.
- Place a ballast at one end of the cord (a 500 g weight for example).
- Mark each 120 cm spacing with a thin line (red sharpie for us) on the cord.
- Do the same every 80 cm starting from the same marking as the previous line.
- Finish with the 50 cm.
- Fix the second ballast at the other end of the cord.
Tip: When 2 or 3 colors are on the same marking, trace the colors side by side. That’s why you should make sure that the marking lines are not too thick.
Step 2: Set up the slalom area on the ground
Ideally, you need an area that is at least 8 m wide and 32.80 m long (if you follow the rules) so that you have a bit of room around the cones to turn and take speed.

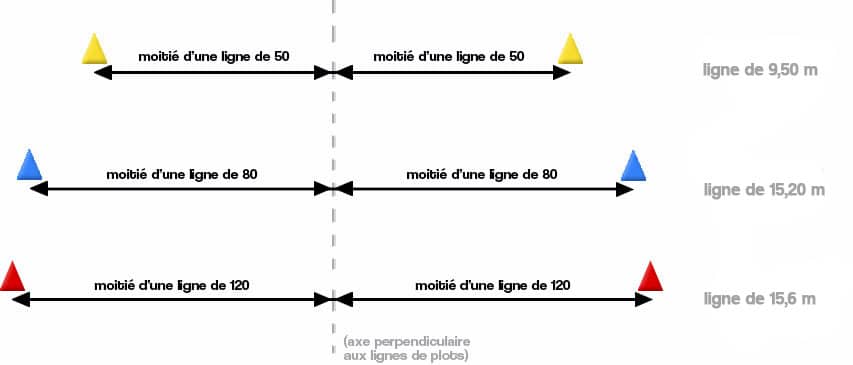
half of the 50’s / half of the 50’s — 9.50 m line
half of the 80’s / half of the 80’s — 15.20 m line
half of the 120’s / half of the 120’s —15.6 m line
(axis perpendicular to the cone lines)
It’s easier with two people!
Unless you have somebody to help you hold the cord, the ballasts will prove much useful! Let’s start by tracing 3 parallel lines of about 20 m with a piece of chalk. They will be used as support for the final lines.
- Trace a first straight line of about 20 m with the piece of chalk, following the taunt cord to go straight.
- Now trace a second line parallel to the first one.
- Measure a spacing of 2 m between the two lines… That is to say the same spacing as between 4 cones of the 50’s.
- Draw an X with the chalk 2 m from the start of the first line, and perpendicular to it.
- Draw another X, perpendicular to the end of the other line.
- Hold the cord between those two Xs and you’ll have a second line perfectly parallel to the first one.
- Renew the operation for the 3rd line
- Now you’ll have to trace a line perpendicular to the three previous ones, right in the middle of them. the crossing between that last line and the three others will provide you the exact middle of each, for all to be centered.
- From that crossing you’ll have to determine the ends of each cone line.
- Let’s start by the 120 cm line:
- Take the first and last 120 cm markings of your cord and place them side by side.
- The cord is folded in two…
- Which makes half the length of the line, it’s the ‘radius’ of your line.
- Stretch the half-length of the 120 m from the middle crossing mark
- Use it to place the first and last cones of the line
- Repeat for the 80’s and 50’s
- Once you know where the first cones of each line are, it’s a lot easier to place the rest of the cones with the cord!
- Draw Xs to center each cone
- Once all the Xs drawn, all you have to do left is to make circles around the Xs. To make a perfect circle, use a cone! And it will be easier to put them back into their exact place when they move.
And you’re done! We’ll make a video soon for it to be more visually explicit, we promise!
![]()
Useful links
Carrying tip for your slalom cones
The slalom skater’s perfect kit
Translation: Chloe Seyres
Photos : MagicSeb, Begonia, REL
