Learning the Magic Slide
Before succeeding at Parallel sliding, we would advise you to learn the Magic slide first. It is a braking technique involving sliding with your legs in an X position. That technique requires a bit of training but it is impressively efficient...
Par alfathor
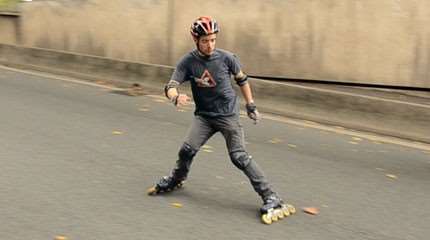
The Magic Slide: as safe as efficient
« Learning to brake with a Magic Slide » (French)
If you don’t feel up learning the Parallel slide technique, you can have a try at Magic sliding.
The principle is quite similar to that of the parallel slide except that you place your legs in an X position (knees to the inside just like on the picture, feet wide apart and tilted towards the inside, on the inside edges of the wheels) while braking.
With such a stance, you gain in stability as you can increase the angle of tilt of your front foot according to the ground (to prevent toppling over), and keep balance with the support provided by your back foot.
Tip: learn on wet ground!
 We would advise you to train on a wet slopy ground in order to ease the different stages of learning of the Magic slide.
Indeed, skates skid well on water because of the grip reduction. Going down a slope also makes the positioning of your body easier and enables to slide on a straighter line. The method described below is one of the possible methods to launch a Magic slide.
It is the easiest way, provided that you are flexible enough to do a Soul slide with one foot perpendicular to the slope.
Don’t forget your protective gear for the first attempts!
Step 1: First, mastering the Soul slide
In order to do a successful Magic slide, you should first know how to do a Soul slide.
Soul sliding consists in placing your front foot perpendicular to the back foot.
- Gather speed in a gentle slope or on flat ground (15 to 20 kph seems to be a good basic speed on dry ground, 5 to 10 kph are enough on wet ground);
- Put your body weight rather on your (soon-to-be) back foot;
- Bend on your back leg;
- Put your best foot in a Soul position (like a one-footed plow stop), in the same axis as your back foot;
- Tilt the foot towards the inside edge, as opposed to the direction you go to.
Soul Slide: Mistakes to avoid
Being too stiff: you may end up toppling over
The sliding foot too much on the side: you won’t manage to slide
The sliding foot too much in front: avoid putting it on the same line as the back foot, try to keep each foot on their corresponding hip lines (hip width) for more stability.
Step 2: The next step to Magic sliding
- After having launched your Soul slide…
- Place your back foot like for a T-stop,
- So that your body is parallel to the road and to the direction you go to;
- At that point, both your feet are parallel and you slide (on a few cm at first, and eventually a lot more);
- Bend down and put your body weight equally on both your feet, wide apart (on their inside edges) and knees bent in order to gain in stability.
Magic Slide: Mistakes to avoid
- Do not launch a T-stop with your back foot before placing the front foot in a Soul position or you’ll probably end up in a mess!
- Do not put too much weight on your back leg: it has only a supportive job, 90% of the sliding is done by the front leg.
Evolution: Sliding in-between lines of cones
Here is a game which slalomers and free skaters are very fond of: lane sliding!
- Get a dozen cones;
- Make a lane, about 1.5 m wide, marked with 2×5 cones;
- Start at a good distance and slide in the lane:
- Gradually reduce the width of the lane as you master the spacing.
The are two goals in that game:
- Doing the longest and straightest slide as possible;
- Managing to slide in the narrowest space as possible.
The best sliders manage to slide in lanes hardly wider than their skates!
A video compiling a few mistakes to avoid(in French)
A lire également
Artistique inline - Comment monter vos platines de roller artistique inline ?
19 août 2020 - par Priscillia ARGUIMBAU-BOATTO
All - Interview with Elisabet Martin Mora, vice-president of WIFSA
26 avril 2020 - par Priscillia ARGUIMBAU-BOATTO
All - Inline figure skating brands all around the World
19 avril 2020 - par Priscillia ARGUIMBAU-BOATTO

Toutes - De la glace au roller artistique inline : rencontre avec les Sisters Ice
17 août 2019 - par Priscillia ARGUIMBAU-BOATTO
ukasz
20 janvier 2016 at 0 h 02 minProlifica
8 juillet 2015 at 11 h 05 minLuke
22 juin 2015 at 11 h 13 minGiuliano Ferrari
14 juillet 2014 at 20 h 49 min